


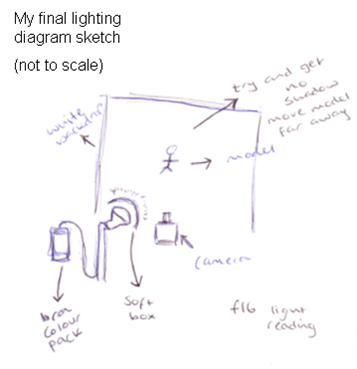
before my shoot day, i was struggling to know what lighting to use? I therefor drew a lighting diagram showing my original plan....

i then had a talk with Jonathon, as i thought he would be able to help, as he has worked previously with fashion editorials. The diagram shown below is the sketch he drew for me, explaining his thoughts....

After my talk with Jonathon i then tried experimenting with the boom light, but felt the equipment hard to work with, so as i felt not as confident as what i would of liked, i therefore decided to go for a simple lighting plan that i knew had worked before with other fashion editorials.
editorial choice and reasons behind selection


camera position : for my shot, I wanted to use an eye level camera angle. From using this type of angle, I was able to highlight a fairly neutral shot, positioned as though it is a human observing a scene. By portraying this, I was also able to focus onto the model yet leave plenty of background in detail.
focal length: When choosing my focal length, i did some research on different types of lenses, and learnt, that if I chose a standard lens it would make the image in the photo appear in perspective similar to the original scene. It also has an angle of view of around 50 to 55 degrees diagonally and is roughly the same as the angle that the human eye can comfortably view, which is why it gave I thought, a natural-looking perspective. By using a 90mm standard lens I was able to achieve a wide aperture, which was perfect for my shoot, as I was shooting from low-light. I'm glad I chose a 90mm standard, as when viewing the final image's, I thought it helped focus attention on the subject, rather than distracting the viewer with an unusually distorted image, and was great for including some surrounding to put the subject in context.
Exposure: In photography, exposure is the total amount of light allowed to fall on the photographic medium during the process of taking a photograph. When shooting I used an iso of 160 and used 1/500th of a second. I think In my final image of the bin bag outfit, I think you can notice a slightly overexposed area ( by the hair), which can be seen as highlighted detail, creating bright parts of the image to be noticed as `washed out`. Luckily when printing I was able to apply the burning technique, which gave me the opportunity to correct that exposure.
Lighting: For my shoot I decided to use a simple lighting plan, as when researching I learn a lot of fashion advertising campaigns use this technique a lot. Before my shoot I looked into different light sources, but in the end decided to use a medium size soft box. From previous workshops in the year I leant, soft boxes work by confining the light from a lamp into a closed chamber and releasing it through at least one layer of diffusion material. I also learnt, the larger the light source, in relation to the subject, the softer the light becomes, which was useful when deciding what size to use for my shoot. When viewing the contact sheets I noticed that this piece of lighting equipment enabled, light to pass through the translucent fabric and scatter, producing a very even and soft result. Perfect when comparing and incorporating similar approaches to fashion advertising shoots. From using this type of light, I thought it worked well as a fill light, as it didn’t cast harsh shadows. I think overall, the large soft box covered the entire subject with light allowing a softer light and softened edges of shadows.
No comments:
Post a Comment